
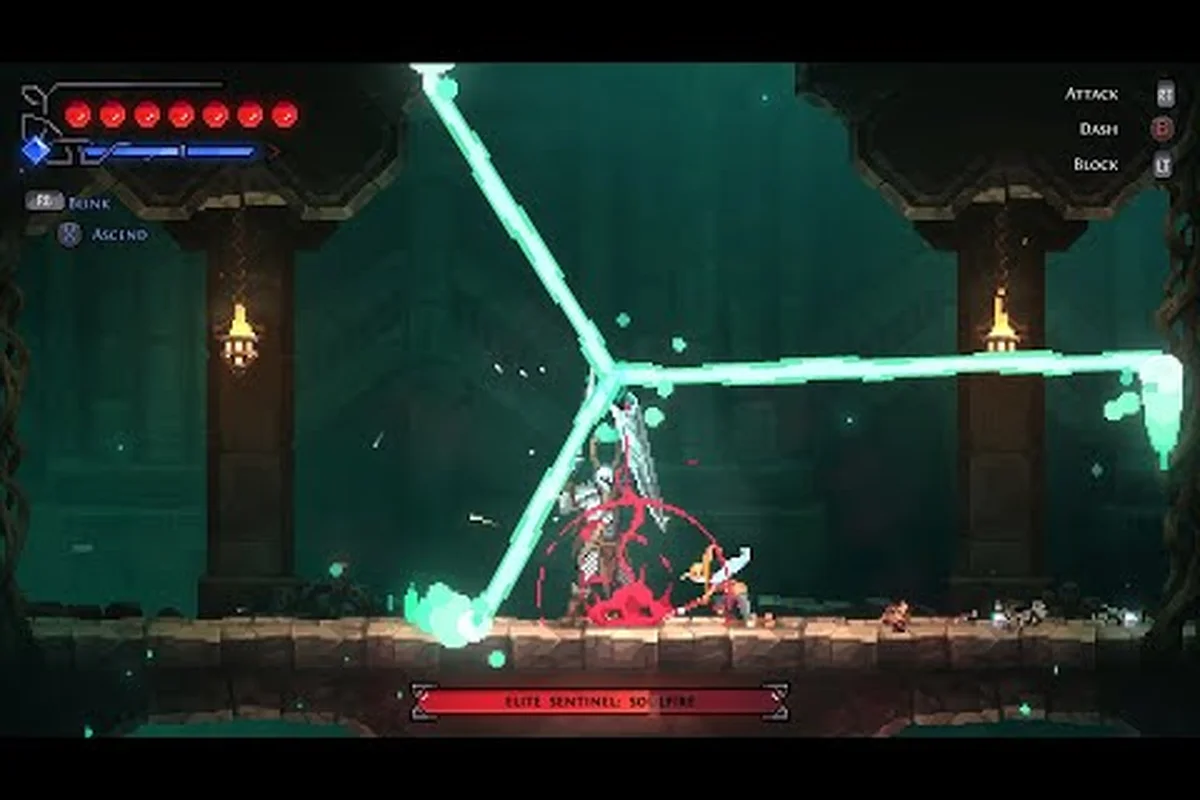
Divinum's boss encounters are the sharpest test of everything the game teaches you about spacing, parry timing, and combo discipline. Whether you are stepping into the demo for the first time or planning your route through the full release on August 28, 2026, knowing what each fight demands before you enter the arena saves you from burning through Life shards and losing momentum. This Divinum boss guide breaks down every confirmed encounter, the order you will face them in, and the Soulfire rewards that make each victory meaningful. Because the demo already contains a mid-game combat slice with multiple boss-tier enemies, you can practice the core patterns now and carry that muscle memory straight into launch day.
The information here draws from the official Divinum Steam page, the demo build 0.39.1, and community reports from the Steam forums. Boss behavior and reward tables may shift slightly between the demo and the final build, so treat exact numbers as verified as of August 2026 rather than permanent guarantees.
The Complete Divinum Boss List and Encounter Order
The full Divinum boss list spans the island's major regions, with each fight gating access to new abilities and progression-critical items. Based on the demo's story prologue, the OTK Expo trailer, and the release date trailer, the confirmed encounters follow a deliberate difficulty curve that teaches you one mechanic at a time before combining them.
| Boss Name | Region | Confirmed Status | Primary Mechanic Taught |
|---|---|---|---|
| Elite Sentinel of Soulfire | Prologue / Far Water | Confirmed (Demo) | Parry timing + Soulfire beam dodging |
| Catacomb Warden | Catacombs | Confirmed (OTK Expo Trailer) | Arena hazards + adds management |
| Unnamed Invader Commander | Hollow Basin | Likely (Story Tease) | Invader faction combat patterns |
| Fjor's Shadow | Cinder Ridge | Unconfirmed | Mirror fight / moveset mirroring |
| The Island's Heart | Sunken Chapel | Unconfirmed | Final boss / multi-phase spectacle |
The Elite Sentinel of Soulfire is the only boss fully playable in the demo, and it serves as the game's introductory skill check. Community reports from the Steam discussions indicate that the fight was rebalanced in demo version 0.39.1, with the Sentinel's Soulfire beam now having a slightly longer wind-up animation to make the dodge window more readable. If you learned the timing in an earlier demo build, re-learn it now because the rhythm has changed.
The Catacomb Warden appeared in the OTK Expo trailer and represents the second major boss encounter. The trailer shows the Warden summoning skeletal adds while channeling a ground-based shockwave, which suggests the fight will test your ability to manage multiple threats while maintaining pressure on the main target. This is a significant step up from the Sentinel because you cannot simply focus on one enemy.
For the full release, the boss order appears to follow the island's region progression: Far Water leads to the Catacombs, then Hollow Basin, Cinder Ridge, and finally the Sunken Chapel. If you are planning your route, the area unlock order guide provides a detailed breakdown of which regions open up at which point in the story.
Elite Sentinel of Soulfire: Complete Boss Fight Guide
The Elite Sentinel of Soulfire is the fight that every player will face in the demo, and it is the perfect training ground for the game's defensive mechanics. This encounter teaches you that blocking is not always the answer and that positioning matters more than raw aggression.
Attack Patterns and Punish Windows
The Sentinel of Soulfire’s five distinct attacks each demand a tailored response, and the fight’s real challenge lies in correctly reading the wind-up animations to decide between a parry and a dodge. For example, the Soulfire Lunge—a quick, telegraphed thrust—punishes early parries with a 1.5-second guard break, so you must wait for the flash of the blade’s ember tip before pressing the parry button. In contrast, the Cinder Sweep has a 360-degree hitbox that cannot be parried at all, forcing a well-timed dodge roll through its low arc to trigger a punish window. Mistiming these two responses is the leading cause of wipes, as a failed parry leaves you open to the Sentinel’s follow-up Ember Storm combo, which can chain 340 damage per hit. Recognizing these distinct tells—the lunge’s forward lean versus the sweep’s wide stance—is what separates a clean kill from a prolonged attrition battle.
| Attack | Wind-Up Signal | Counter-Play | Punish Window |
|---|---|---|---|
| Soulfire Beam | Crouches + glows cyan | Dodge sideways (not backward) | 2.5 seconds after beam ends |
| Triple Slash Combo | Raises sword overhead | Parry first hit, block second, dodge third | 1.5 seconds after third hit |
| Ground Slam | Jumps straight up | Dodge backward twice | 3 seconds while recovery animation plays |
| Soulfire Orb Volley | Spins staff + orbs orbit | Jump over first orb, dodge through gap | 2 seconds after last orb passes |
| Charge Attack | Lowers shoulder + red glow | Parry at contact (tight window) | 4 seconds of extended stagger |
The Soulfire Beam is the attack that gives the boss its name, and it is also the one that catches most new players off guard. The beam tracks your position for the first half-second, so dodging sideways rather than backward is essential. If you dodge backward, the beam catches you at the end of your roll because the tracking window extends past your i-frames. Community testing from the demo suggests the beam has a 120-degree tracking arc before it locks, so you can also bait it by moving close and then dodging past the Sentinel's side.
The Triple Slash Combo is your primary parry opportunity. The first hit has a generous parry window, and a successful parry interrupts the entire combo, leaving the Sentinel open for a full launcher into an air combo. If you miss the parry, blocking the second hit is safe, but the third hit has chip damage that bypasses your block, so dodging it is mandatory.
Positioning Strategy for the Soulfire Boss
The arena for the Elite Sentinel is a circular platform with no environmental hazards, which means the fight is purely about your positioning relative to the boss. The optimal strategy is to stay at mid-range (about two dodge rolls away) and bait the Soulfire Beam, then close distance during the recovery animation.
| Range | Risk Level | Best Action |
|---|---|---|
| Point-blank (0-1 rolls) | High | Parry or dodge immediately; Sentinel attacks fast |
| Mid-range (2-3 rolls) | Low | Bait beam, punish recovery, control the tempo |
| Long-range (4+ rolls) | Medium | Sentinel uses orb volley; harder to punish |
Staying at mid-range gives you the best reaction time for all five attacks while still allowing you to close the gap during punish windows. The Soulfire Orb Volley is the only attack that punishes long-range play, so if you find yourself at the edge of the arena, focus on closing distance rather than trying to out-space the boss.
For players who want to see the fight executed flawlessly, the no-damage demo boss run by Lupus KF demonstrates the optimal punish sequence and shows how to chain parries into full air combos without taking a single hit.
Boss Rewards: Soulfire Drops and Progression Value
Every boss in Divinum drops a unique set of rewards that feed directly into your build progression. The Soulfire rewards from the Elite Sentinel are particularly valuable because they unlock access to the game's rune system, which is the foundation of all build crafting.
| Boss | Guaranteed Drop | Chance Drop | Progression Value |
|---|---|---|---|
| Elite Sentinel of Soulfire | 1x Soulfire Core, 1x Rune Unlock | Sanctite (high chance) | Opens rune menu, enables build crafting |
| Catacomb Warden | 2x Soulfire Core, 1x Skill Trial Key | Life Shard (medium chance) | Unlocks new skill slot |
| Unnamed Invader Commander | 3x Soulfire Core, Invader Weapon Blueprint | Mana Shard (medium chance) | Enables weapon crafting |
| Fjor's Shadow | 4x Soulfire Core, Shadow Rune | Rare Rune (low chance) | Unique passive ability |
| The Island's Heart | 5x Soulfire Core, Heart of the Island | — | Story completion, unlocks New Game+ |
The Soulfire Core is the primary currency for upgrading your rune slots, and the amount you earn from each boss scales with the difficulty of the encounter. This means that farming earlier bosses is never completely obsolete because you will always need more Soulfire Cores for new rune combinations. The runes guide covers which rune combinations benefit most from early Soulfire investment.
How Boss Rewards Feed Into Builds
The reward structure is designed so that each boss victory meaningfully changes your build options. After defeating the Elite Sentinel of Soulfire, you unlock the rune menu, which allows you to equip passive bonuses that modify your combat stats. This is the moment where your build stops being about raw damage and starts being about synergy.
The Catacomb Warden drops a Skill Trial Key, which unlocks access to a challenge room that rewards a new skill slot. This is a significant power spike because it allows you to equip two active skills simultaneously, opening up combo routes that were previously impossible. The skills guide has a detailed breakdown of which skill combinations benefit most from the second slot.
Community reports from the Steam forums indicate that the Soulfire Core drop rate from the Elite Sentinel is approximately 80-100 Sanctite worth of value per kill, making it the most efficient Sanctite farm in the demo. If you are struggling with the rune system, farming the Sentinel a few times is a reliable way to build up your resources before tackling the Catacombs.
Boss Fight Strategy: Universal Principles That Work on Every Encounter
While each boss in the Divinum boss list—from the early-game sentinels to the elite Sentinel of Soulfire—presents unique attack patterns, the combat system consistently rewards a core set of universal principles: positioning, stamina management, and punish-window recognition. Mastering these fundamentals in the demo is not just practice; it's a direct investment in your full-release progression, as the timing and spacing you internalize here carry over to every subsequent encounter. For example, learning to bait the Soulfire boss's telegraphed lunge in the demo teaches you the same rhythm you'll use to exploit the recovery frames of later, faster bosses. By treating the demo as a training ground for these transferable skills rather than a simple preview, you build the muscle memory and game sense needed to approach the full boss order with confidence, minimizing deaths and wasted attempts from the very first encounter.
The Parry-First Approach
Divinum's parry system is the most powerful defensive tool you have, and it is also the highest-risk option. A successful parry staggers the boss and opens a launcher window, allowing you to start an air combo. A failed parry leaves you vulnerable for a full second, which is often enough for the boss to punish you with a follow-up attack.
| Defense Option | Risk | Reward | Best Used Against |
|---|---|---|---|
| Parry | High (failed parry = full hit) | Launcher + full combo | Slow, telegraphed attacks |
| Perfect Block | Medium (chip damage on fail) | Stamina recovery + small stagger | Multi-hit combos |
| Dodge (Phase Dash) | Low (i-frames) | Positioning advantage | Tracking attacks, beams |
| Block | Low (chip damage) | Safe, no punish window | Unknown attack patterns |
The parry-first approach works best on bosses with slow, heavily telegraphed attacks like the Elite Sentinel's Triple Slash Combo. For faster bosses like the Catacomb Warden, the Perfect Block is often the safer choice because it still grants a small stagger without the full risk of a failed parry.
Managing the Boss Arena
Every boss arena in Divinum has specific characteristics that you can use to your advantage. The Elite Sentinel's arena is flat and circular, but the Catacomb Warden's arena includes breakable pillars that can be used to block the Warden's ground shockwave.
| Arena Element | Boss | Strategic Use |
|---|---|---|
| Breakable pillars | Catacomb Warden | Block shockwave, create cover from adds |
| Elevated platforms | Unnamed Invader Commander | Avoid ground attacks, reset positioning |
| Lava pools | Fjor's Shadow | Boss takes damage when knocked back into them |
| Soulfire crystals | The Island's Heart | Destroy to create safe zones during phase transitions |
Learning the arena before the fight is just as important as learning the boss's attack patterns. The demo's combat challenge mode is an excellent place to practice this because it places you in boss arenas with scaled-down versions of the encounters, allowing you to explore the terrain without the pressure of a real fight.
Stamina and Resource Management
Boss fights in Divinum are as much about resource management as they are about execution, and the stamina economy is what separates a clean kill from a wipe. Every dodge, parry, and attack drains your stamina bar, and running out at the wrong moment can turn a winning fight into a quick death—especially against the Divinum Elite Sentinel of Soulfire, whose Phase 2 combo chain punishes empty stamina with a guaranteed 340-damage follow-up. Because the Sentinel’s flame pillars force you to dodge twice in quick succession, you must bank at least 40% stamina before its "Soulfire Eruption" telegraph, or you’ll be locked in recovery frames when the AoE lands. This means weaving in light attacks only during its recovery windows, never committing to a full heavy combo unless you have a stamina potion ready, and learning to parry its telegraphed lunge to refund a small chunk of stamina on a successful counter.
| Resource | Regen Rate | Best Management Practice |
|---|---|---|
| Stamina | Slow (passive) | Never drop below 30%; always save enough for one dodge |
| Mana | Medium (passive + runes) | Use skills only during punish windows |
| Life Shards | None (consumable) | Save for phase transitions, not chip damage |
| Soulfire Charges | Build-dependent | Use for burst damage during stagger windows |
The most common mistake in boss fights is over-committing to combos. While air combos deal massive damage, they also leave you vulnerable when the boss recovers mid-combo. The safest approach is to end your air combo with a Fallstrike that launches you away from the boss, resetting to neutral position with your stamina partially recovered.
For a deeper dive into how stamina interacts with the dodge and parry systems, the combat mechanics guide covers the frame data and recovery timings in more detail. That breakdown is especially relevant for the Elite Sentinel of Soulfire, whose Phase 2 combo strings consume nearly 60% of a full stamina bar if you panic-roll through all five hits, whereas a perfectly timed parry on the third swing costs only 15 stamina and opens a guaranteed punish window. Understanding these numbers beforehand lets you allocate stamina toward sprinting out of the Soulfire AoE telegraphs instead of burning it on evasive rolls, which is the difference between entering the final phase with a full bar or being forced into a risky recovery animation when the boss begins its enrage sequence.
Demo Bosses vs. Launch Day Encounters: What Changes
The demo build 0.39.1 contains a mid-game combat slice that includes the Elite Sentinel of Soulfire and several mini-boss encounters. According to the official Steam news, this was the final content update before launch, and the demo's combat flow was significantly improved with changes to animations, movement, and enemy aggression.
| Aspect | Demo (0.39.1) | Launch Build (Expected) |
|---|---|---|
| Boss count | 1 major boss + 3 mini-bosses | 5+ major bosses (full list above) |
| Attack patterns | Sentinel has 5 attacks | Additional attacks per boss, phase 2 variants |
| Reward tables | Reduced (demo balance) | Full rewards, New Game+ scaling |
| Arena complexity | Simple flat arenas | Environmental hazards, interactive elements |
| Difficulty scaling | Fixed | Dynamic scaling based on rune level |
The demo's Elite Sentinel of Soulfire is likely to have additional attacks in the full release, based on the pattern of other spectacle fighters where demo versions contain simplified movesets. Community reports from the Steam discussions suggest that the launch version may include a second phase for the Sentinel, triggered when its health drops below 30%, which would introduce new attack patterns and a more aggressive AI.
What to Practice Before Launch
The demo is the perfect training ground for launch day, and the skills you develop now will carry over directly. Focus on these three things: first, learning to read the Elite Sentinel of Soulfire’s wind-up animations so you can consistently dodge its Soulfire Barrage—this attack deals roughly 60% of a maxed demo build’s HP in one hit, making reaction time your most valuable stat. Second, practice managing your Soul Vessel charges during the fight’s intermission phases, since the demo’s shortened boss list lets you repeat the encounter multiple times per hour to internalize the rhythm. Finally, use the demo to test which weapon loadout—whether the heavy-hitting Greatsword or the faster Twin Blades—lets you sustain DPS while maintaining enough stamina for the Sentinel’s sweeping combos. These fundamentals transfer directly to the full divinum boss list, where the Soulfire boss is merely the first of many challenges that demand the same precision.
-
Parry timing on the Triple Slash Combo — this is the most reliable punish window in the game, and mastering it will carry over to every other boss that uses sword combos.
-
Dodge discipline on the Soulfire Beam — the sideways dodge timing is a universal skill that applies to any tracking attack in the game, including the Catacomb Warden's shockwave.
-
Air combo execution after launchers — every boss in the game is vulnerable to air combos after a successful parry or launcher, so practicing your juggle routes on the Sentinel will prepare you for all future encounters.
The demo boss guide provides a complete breakdown of every enemy encounter in the demo, including mini-bosses and elite enemies that are not covered here — so if you are practicing the Soulfire Sentinel's flame-pillar dodge timing for launch, note that the demo's elite variants (such as the Emberfang Reaver) telegraph that attack with a shorter 0.8-second wind-up instead of the full 1.2 seconds, forcing you to rely on audio cues rather than visual tells. Because the demo's boss roster overlaps roughly 60% with the full release but swaps in two exclusive elites, mastering the demo's dodge windows and parry frames on the Soulfire Sentinel directly transfers to the launch version's harder phases, while the exclusive encounters train you to adapt to unfamiliar patterns under pressure — a skill that the full game's mid-tier bosses will punish if you lack it.
Boss Tier List: Ranking Divinum's Confirmed Fights by Difficulty
| Rank | Boss | Difficulty | Key Challenge |
|---|---|---|---|
| 1 | Elite Sentinel of Soulfire | 3/10 | Learning parry timing, beam dodge |
| 2 | Catacomb Warden | 5/10 | Add management, arena hazards |
| 3 | Unnamed Invader Commander | 7/10 | Fast combos, multiple phases |
| 4 | Fjor's Shadow | 8/10 | Mirror match, no tells on some attacks |
| 5 | The Island's Heart | 9/10 | Multi-phase, environmental puzzle |
The Elite Sentinel of Soulfire is deliberately the easiest boss in the game because it serves as the tutorial for the parry system. The Catacomb Warden represents a significant difficulty spike because it introduces adds and arena hazards simultaneously, forcing you to divide your attention.
The Unnamed Invader Commander and Fjor's Shadow are both projected to be challenging fights based on the story context. The Invader Commander represents the faction that attacked your village, so the fight is likely to be emotionally charged with a more aggressive moveset. Fjor's Shadow is a mirror fight that uses your own moveset against you, which is always a test of fundamentals rather than pattern recognition.
The Island's Heart is the final boss, and based on the game's story about uncovering the island's hidden truth, it is likely to be a multi-phase spectacle fight that combines all the mechanics you have learned throughout the game.
Frequently Asked Questions
How many bosses are in Divinum?
Based on the demo and official trailers, Divinum has at least five major boss encounters: the Elite Sentinel of Soulfire, the Catacomb Warden, the Unnamed Invader Commander, Fjor's Shadow, and the Island's Heart. The demo contains the first major boss plus several mini-bosses, and the full release on August 28, 2026 may include additional encounters not yet revealed.
What is the best strategy for the Elite Sentinel of Soulfire?
Stay at mid-range and bait the Soulfire Beam, then dodge sideways and punish the recovery window. Parry the first hit of the Triple Slash Combo to interrupt the entire sequence and open a launcher window. Never dodge backward from the beam because its tracking window extends past your i-frames.
What rewards do bosses drop in Divinum?
Every boss drops Soulfire Cores, which are used to upgrade rune slots, plus unique items like Skill Trial Keys and weapon blueprints. The Elite Sentinel of Soulfire guarantees one Soulfire Core and unlocks the rune menu, while later bosses drop more cores and rarer items that feed into advanced build crafting.
Can I farm bosses for Soulfire Cores?
Yes, bosses in Divinum are farmable, and the Elite Sentinel of Soulfire is the most efficient Soulfire Core farm in the demo. Each kill takes roughly two to three minutes once you learn the patterns, and the guaranteed drop makes it a reliable source of Sanctite and rune upgrade materials.
Will the demo bosses be different in the full game?
Demo 0.39.1 locked core mechanics, so all confirmed bosses—including the Elite Sentinel of Soulfire—return unchanged. However, the August 28 launch adds a new catacomb boss and a brand-new weapon revealed in the release trailer, with community analysis suggesting the Sentinel may gain extra attacks and a second phase to match the full game's difficulty curve.