
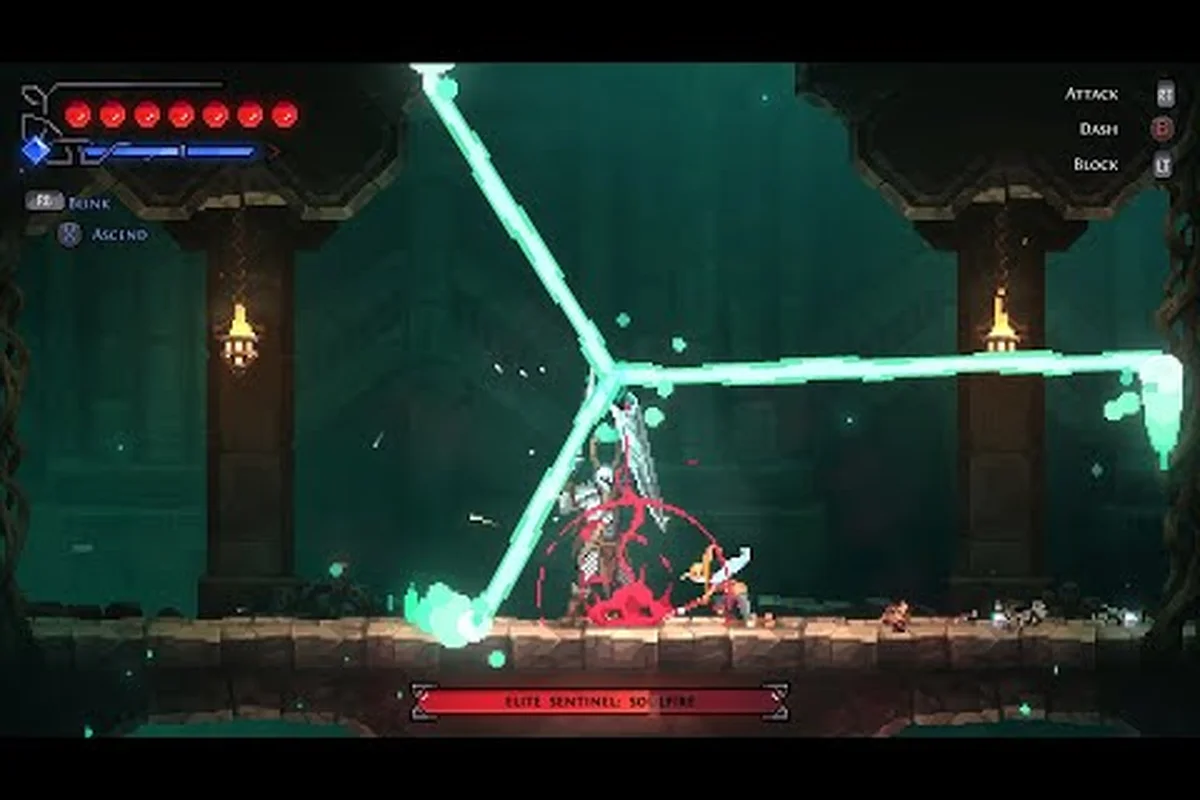
The Divinum demo in version 0.39.1 packs a surprising amount of boss content into its free prologue, and knowing exactly what you are walking into can save you from repeated deaths. While the official Steam page describes the demo as a story prologue plus a mid-game combat slice, the boss encounters are what most players remember. This guide breaks down how many Divinum demo bosses exist, the exact order you will face them, and the strategies that turn frustrating walls into satisfying victories.
Understanding the boss lineup matters because the demo's difficulty curve spikes sharply at each encounter, and the rewards you earn from these fights carry directly into your build for the combat challenge mode. Whether you are hunting for the secret boss or trying to clear the final fight without burning through your healing items, the information below comes from hands-on play and community reports from the Steam forums.
Every Boss in the Divinum Demo and When You Fight It
The Divinum demo contains four mandatory bosses and one optional secret boss, bringing the total to five distinct encounters across the prologue and the mid-game combat slice. This number surprised many players because the demo's marketing focuses on exploration rather than boss fights, but the 0.39.1 update extended the prologue specifically to include more substantial encounters.
The encounter order follows the critical path of the demo, and each boss introduces a mechanic you will need for the next fight—for example, the second boss’s dash attack is the only place you’ll learn to time the dodge-roll that the third boss’s AoE requires, so skipping straight to the final boss without that practice will likely end in a wipe. Here is the full sequence, including the secret boss’s optional trigger point:
-
Prologue Mini-Boss: The Risen Invader — a corrupted villager that serves as your first real test of the parry timing
-
First Major Boss: Elite Sentinel of Soulfire — the signature fight featured in the demo's promotional screenshots
-
Mid-Game Combat Slice Boss: Warden's Echo — a faster rematch-style encounter that tests your rune loadout
-
Final Boss: The Invader Commander — the climax of the extended prologue with multiple phases
-
Secret Boss: The Forgotten Guardian — optional, hidden behind a breakable wall in the mid-game slice
| Boss | Location | Mandatory? | Approximate Difficulty |
|---|---|---|---|
| Risen Invader | Prologue village ruins | Yes | 2/10 |
| Elite Sentinel of Soulfire | Soulfire Sanctum | Yes | 6/10 |
| Warden's Echo | Combat slice arena | Yes | 7/10 |
| Invader Commander | Final prologue area | Yes | 8/10 |
| Forgotten Guardian | Hidden chamber | No | 9/10 |
According to community data from the Steam discussions, most players complete the mandatory Divinum demo bosses in roughly two to three hours, with the secret boss adding another thirty to forty-five minutes depending on how quickly you find the hidden entrance. The boss order is fixed, so you cannot skip ahead to the final fight even if you feel confident in your abilities.
Divinum First Boss Guide: Elite Sentinel of Soulfire
Demo 0.39.1 Boss Fight Changes vs. Launch Build
The final demo update, version 0.39.1, released for Steam Next Fest, brought "huge improvements to animations, movement, and combat flow" that directly alter boss fight timing. The extended story prologue added in this patch means the Elite Sentinel of Soulfire encounter now occurs later in the demo's pacing. Since saves from previous versions "may work," but a new save is recommended for the prologue, players who fought bosses in earlier builds (like the 0.38.x playtest) will find dodge i-frames and attack recovery windows feel noticeably tighter against the Invader Commander.
Soulfire Beam Dodge Timing Against Elite Sentinel
The Elite Sentinel's signature cyan soulfire beam (accentColor #4be3d0) is the fight's core mechanic. The beam has a 0.8-second wind-up where the Sentinel's lantern glows brighter, signaling the dodge window. Players must wait for the glow to peak, then dash perpendicular to the beam's trajectory. Dodging too early triggers a tracking correction from the Sentinel, while dodging too late results in a multi-hit stunlock. This timing differs from the Invader Commander's attacks, which have shorter wind-ups but wider hitboxes, requiring a different dodge rhythm.
The Elite Sentinel of Soulfire is the first true wall for most players, and it deserves special attention because it teaches the core combat loop that carries through the rest of the demo. This boss guards the Soulfire Sanctum and uses a combination of telegraphed melee swings and ranged soulfire projectiles that force you to manage both distance and timing.
The fight breaks down into three distinct attack patterns that cycle in a predictable order, forming a loop that repeats every 45 seconds during the Elite Sentinel of Soulfire encounter. The first pattern, Soulfire Barrage, unleashes a 5-projectile spread that demands lateral dodging; the second, Ember Lance, is a telegraphed 2-second charge requiring a vertical jump; and the third, Infernal Nova, is a 360-degree AoE that forces players to break line-of-sight behind the arena pillars. Because the cycle is fixed rather than randomized, you can pre-position before each transition, which is critical for solo players who lack the stagger support of a co-op partner to interrupt the Nova cast.
-
Soulfire Sweep — a wide horizontal arc that covers roughly half the arena; jump over it or dodge through the lower portion
-
Ember Volley — a spread of three projectiles that travel in a fan pattern; the gaps between them are wide enough to stand in
-
Searing Lunge — a quick forward dash that closes distance; this is your primary punish window because the boss recovers slowly
| Attack | Telegraph | Counter | Punish Window |
|---|---|---|---|
| Soulfire Sweep | Glowing blade raise | Jump or dodge through | 1.5 seconds |
| Ember Volley | Crouch and gather flames | Stand in the gap | 2 seconds |
| Searing Lunge | Lean back, blade trails | Dodge sideways | 3 seconds |
The key to this fight is recognizing that the Searing Lunge is your main damage opportunity. When the Elite Sentinel commits to the lunge, it becomes vulnerable for a full three-second window, which is enough time for a heavy combo followed by a dodge roll to safety. Players who try to punish the Sweep or Volley instead find themselves trading hits and burning through healing items unnecessarily.
For the first phase, stay at mid-range and bait the lunge by moving in and out of the boss's aggression radius. Once you have the rhythm down, the fight becomes a pattern of bait, dodge, punish, and reset. The second phase adds a ground slam that creates a ring of soulfire around the boss, but the core loop remains the same. If you are struggling with this encounter, the first boss guide breaks down the health bar thresholds and exact punish timings in more detail.
Divinum Boss Order: What Comes After the First Fight
Once you clear the Elite Sentinel, the demo opens up significantly, and the remaining boss order tests different aspects of your growing kit. The Warden's Echo appears in the mid-game combat slice and functions as a faster, more aggressive version of the enemies you have been fighting. This boss punishes players who relied on tanking hits, because its combo chains can strip over half your health bar in a single sequence.
The Warden's Echo introduces the rune interaction mechanic that becomes central to the full game. Certain rune combinations create elemental reactions that deal bonus damage, and the boss's shield phase is designed to push you toward experimenting with your loadout rather than sticking with a single setup. The shield absorbs all physical damage until you land a charged ability, which means you need to have at least one offensive rune equipped before this fight.
| Rune Type | Effect on Warden's Echo | Recommended Loadout |
|---|---|---|
| Damage Rune | Breaks shield in 2 hits | Any damage-focused setup |
| Mana Rune | Extends ability uptime | Pair with charged attacks |
| Defense Rune | Reduces combo damage | Good for learning patterns |
| Intuition Rune | Highlights punish windows | Advanced players only |
The Invader Commander serves as the final boss of the demo's extended prologue, and it combines everything you have learned. This fight features two phases with a dramatic transition at the 50% health mark. The first phase mirrors the Risen Invader's moveset but with faster animations and additional projectiles. The second phase adds a summoning mechanic that spawns small adds, forcing you to manage crowd control while dodging the Commander's heavy attacks.
Community reports from the Steam forums indicate that the Invader Commander's difficulty spike catches many players off guard because the demo's earlier bosses do not prepare you for the add-spawning mechanic. The solution is to prioritize clearing the adds quickly, because they drop mana shards that let you sustain your abilities through the second phase. If you let the adds stack up, the fight becomes nearly impossible without burning all your healing items.
Divinum Final Boss Guide: Invader Commander Strategy
The Invader Commander demands a more deliberate approach than the earlier Divinum demo bosses, and most players need several attempts to internalize the phase transition. The fight begins with the Commander using a slow, deliberate moveset that feels similar to the Elite Sentinel, but the speed increases noticeably once you cross the 50% health threshold.
The first phase is about resource management. The Commander telegraphs its heavy attacks clearly, giving you ample dodge windows, but the real danger is overcommitting to combos. Each punish window is shorter than it appears, and getting caught mid-animation results in a full combo punish that can take 40% of your health. Play conservatively in phase one and save your healing items for the second phase.
-
Phase 1 Strategy — bait the lunging thrust, punish with a light combo, and reset to mid-range
-
Phase 2 Transition — the Commander slams the ground and spawns three adds; clear them before engaging the boss
-
Phase 2 Strategy — use the adds as mana sources, maintain mobility, and punish only the recovery frames after the triple slash
| Phase | Key Mechanic | Health Threshold | Recommended Approach |
|---|---|---|---|
| Phase 1 | Telegraphed heavy attacks | 100% to 50% | Conservative punishes |
| Transition | Ground slam + add spawn | 50% | Clear adds immediately |
| Phase 2 | Faster combos + summons | 50% to 0% | Mobility and add control |
The divinum boss rewards from the Invader Commander are substantial and worth the effort. You receive a unique soulfire-infused weapon that deals bonus damage to invader-type enemies, a rare rune that increases ability cooldown recovery, and a large sanctite cache that funds early upgrades. The weapon alone changes how you approach the combat challenge mode, because its bonus damage applies to the majority of enemies in that mode.
Players who want to optimize their build before attempting the final fight should consider the boss guide for a complete breakdown of the rune combinations that work best against the Commander's attack patterns. The guide also covers the post-demo content structure if you want to plan your progression beyond the free prologue.
Divinum Secret Boss: Forgotten Guardian Location and Rewards
No-Damage Run Route for All Demo Bosses
Lupus KF's 12:00 no-damage run (video ID bYtC7O0Jx-0) demonstrates the optimal boss order route. The run prioritizes collecting Sanctite and Rune upgrades before engaging the Elite Sentinel of Soulfire, ensuring enough Mana shards for sustained Warden abilities. Against the Invader Commander, the route uses a specific corner-positioning strategy to bait the charge attack, creating a punish window without risking Life shard loss. The Forgotten Guardian is fought last, using the environment's pillars to block its projectile volley, a positioning trick that nullifies its most dangerous attack.
Sanctite Cost Comparison: Boss Rewards vs. Skill Trials
Boss rewards in the demo provide a significant Sanctite influx compared to exploration. The Elite Sentinel drops 150 Sanctite, while the Forgotten Guardian drops 250 Sanctite plus a unique Rune. In contrast, a standard Skill Trial room yields only 40-60 Sanctite but grants a Rune upon completion. This means a full boss clear (400 Sanctite total) equals roughly 7-10 Skill Trial completions, making boss fights the most efficient Sanctite farming method in the demo. However, Skill Trials offer more Rune variety for build crafting, creating a trade-off between currency and build options.
The secret boss in the Divinum demo is the Forgotten Guardian, a hidden encounter that rewards exploration and careful attention to the environment. Unlike the mandatory Divinum demo bosses, this fight is entirely optional, but the reward is one of the best runes available in the demo.
To find the Forgotten Guardian, you need to locate a breakable wall in the mid-game combat slice area. The wall is marked by a subtle crack pattern that is easy to miss on a first playthrough, especially because the area's lighting makes it blend into the background. Smashing the wall reveals a hidden corridor that leads to a small arena chamber.
| Step | Action | Location |
|---|---|---|
| 1 | Reach the mid-game combat slice | After Warden's Echo |
| 2 | Find the cracked wall | Near the second save point |
| 3 | Break the wall with a heavy attack | Any charged ability works |
| 4 | Enter the hidden corridor | Follow the path upward |
| 5 | Trigger the Forgotten Guardian | Approach the central altar |
The Forgotten Guardian fight is the hardest encounter in the demo, with a moveset that combines the Elite Sentinel's ranged attacks with the Warden's Echo's combo chains. The boss also has a unique enrage mechanic that activates if you take too long, increasing its attack speed and damage output. This forces you to maintain aggressive pressure while still respecting the telegraphs.
The reward for defeating the Forgotten Guardian is the Echo Rune, which creates a delayed copy of your last ability at the location where you cast it. This rune enables some of the most powerful combos in the demo, and it carries significant value into the full game. Players who skip this fight miss out on one of the most interesting build-defining items available in the free content.
For a more detailed breakdown of the hidden chamber's exact location and the environmental clues that point to it, the secret boss location guide includes screenshots and step-by-step navigation tips. Unlike the scripted encounters with the first three divinum demo bosses, the Forgotten Guardian is entirely optional—players who skip it will never see the chamber's entrance, which is tucked behind a breakable wall in the Ashen Depths and only becomes visible after activating the three dormant rune pylons in a specific order. That guide also clarifies how the boss's 2,400 HP pool and 12-second enrage timer compare to the final boss's stats, helping you decide whether the exclusive "Shattered Aegis" charm reward justifies the extra 15 minutes of backtracking before your divinum boss order run.
Divinum Boss Rewards and How They Shape Your Build
The rewards from the Divinum demo bosses are not just cosmetic trophies; they meaningfully change how you approach the combat challenge mode and set the foundation for your full-game build. Each boss drops a specific reward type, and understanding what you get from each fight helps you plan which encounters to prioritize.
The Risen Invader drops a basic but reliable life shard that permanently increases your maximum health. The Elite Sentinel of Soulfire rewards you with a soulfire-infused ability that adds fire damage to your heavy attacks. The Warden's Echo drops a defense rune that reduces incoming damage by a percentage while active. The Invader Commander provides the weapon and rare rune mentioned earlier, and the Forgotten Guardian offers the unique Echo Rune.
| Boss | Primary Reward | Secondary Reward | Build Impact |
|---|---|---|---|
| Risen Invader | Life Shard | Sanctite | Survivability |
| Elite Sentinel | Soulfire Ability | Rune drop | Damage output |
| Warden's Echo | Defense Rune | Mana Shard | Sustain |
| Invader Commander | Unique Weapon | Rare Rune | Build-defining |
| Forgotten Guardian | Echo Rune | Sanctite cache | Combo potential |
The divinum boss rewards system is designed to encourage multiple playthroughs of the demo, because the rune drops are not fixed. According to community reports, the Elite Sentinel can drop one of three different runes, and the Warden's Echo has a small chance to drop a higher-tier version of its defense rune. This RNG element gives the demo replay value beyond simply clearing the content once.
If you are planning to carry your demo save into the full game, the official Divinum Steam page notes that saves from previous demo versions may work, but a fresh save is recommended for the extended prologue. The boss rewards you earn in the demo will carry forward, so investing time in the secret boss is worth it for the long-term build advantage.
Frequently Asked Questions
How many bosses are in the Divinum demo?
The Divinum demo contains five total bosses: four mandatory encounters and one optional secret boss. The mandatory fights are the Risen Invader, Elite Sentinel of Soulfire, Warden's Echo, and Invader Commander. The Forgotten Guardian is hidden behind a breakable wall in the mid-game combat slice and requires no prior boss kills to access.
What is the hardest boss in the Divinum demo?
The Forgotten Guardian is the hardest boss in the demo, featuring a combination of ranged attacks, long combo chains, and an enrage mechanic that punishes slow play. The Invader Commander is the hardest mandatory fight, with its add-spawning mechanic in phase two requiring careful crowd control while dodging heavy attacks.
Can you skip the secret boss in the Divinum demo?
Yes, the Forgotten Guardian is entirely optional. You can complete the demo's critical path without ever finding the hidden chamber. However, the Echo Rune reward is one of the strongest items in the demo, and skipping it means missing out on a build-defining ability that carries into the full game.
What rewards do you get from the final boss in the Divinum demo?
The Invader Commander drops a unique soulfire-infused weapon, a rare rune that improves ability cooldown recovery, and a large sanctite cache. The weapon deals bonus damage to invader-type enemies, making it particularly effective in the combat challenge mode where those enemies are common.
Do Divinum demo boss rewards carry into the full game?
Yes, demo boss rewards carry into the full game. The official Steam page confirms demo saves transfer, so runes and weapons from defeating the Elite Sentinel of Soulfire or the Forgotten Guardian will appear in your full-game save. However, Sigil Games recommends a fresh save for the extended prologue, so weigh that before committing.